Colorful Squares, A Friendly Gift 1 of 3

A good friend and longtime client got in touch with me about quilting 3 quilts for a group of her dear friends. They meet up about once a year at a certain destination. This year Sandy (my friend and longtime client) wanted to give her friends a very special gift, the gift of a Quilt. To me there is no better gift. A quilt keeps you warm, comforts you and is a great reminder of the one that made it for you. This quilt is one of three quilts that Sandy made.

And So It Begins

For this quilt Sandy and I choose 2 threads, The So Fine Grey Thread was for SID (Stitch In the Ditch) and the quilting in the Turquoise fabric. The Connecting Threads, Coral Thread was for the rest (the Pretty). The reason I did not want to SID with the Coral thread was because most of the quilt was black and every little tiny mistake would have shown.

I began with the Grey thread, SID was first then I moved on to the turquoise borders.
For marking I used this chalk roller. The marks are 2 inches apart.

Once completely marked, quilt a diagonal line up then down as seen below.


Once you get to the end, quilt diagonal lines in the opposite direction.

Your Diamonds should look like this.
To get these diamonds to look perfect is not an easy task.
So how do you make your diamonds look better?
Add More Quilting 

As you can see below I started with some dot to dot lines, No, No, No these suck.

Loops, MUCH Better, also known as e's and l's

So, Loops on the bottom and a Loops on the top.

Then a Continuous Curve on the inner part of the diamond, across the bottom then across the top.
If you are just beginning I suggest a practice quilt for this type of border.
Practice, Practice, Practice.
Remember it is called Free Motion Quilting and will never be perfect. This is a quilt and if used it will be washed and small imperfections will not be noticed. So give yourself a break and think of the person you are quilting for and put all of your energy and love into what you are doing.
Your quilt will shine.

Once I got to the Corner I came up with this little zig zag to make a cornerstone instead of trying to pull in the loops and curves into the corners.
A cornerstone can be a great idea for a border.

On to the next border.
I was watching a video from Whirls and Swirls, Check it out.
I used all curls and then switched direction on each curl.

I split the border in half and went across twice with the curl design.

Center Inner Points.
 Making sure your points line up.

Take a ruler and chalk, mark a straight line down from top point.
For my points I separated them by 1 1/4 inches, depending on your quilt and the look that you desire you can make your points as far or as close together as you like.
This is what it will look like with 2 lines across each point.

For the center the quilting is from dot to dot. I worked my way across in one direction and then back in the other direction. As seen below by the numbers. Once all the quilting is done for this direction of the quilt (including borders) it is time to turn your quilt.
I know turning quilts is thought of for the inexperienced, the green, the beginners. This may be true but I turn the quilt because I get better results, it's easier than rolling your quilt back and forth over and over again, also it's what I prefer. There's no shame in turning your quilt.

Below: I have turned my quilt and began to work my way across in
both directions. For the black center squares I added some swirls and curls they are added as I work my way across the quilt. So when I come to numbers 2,4,6 or 8 I will throw in the swirls and curls. The Blue inner squares I left un-quilted but I did SID.

Let's talk about "Stitch In the Ditch" SID for a minute.
I prefer it, so I will either SID or DQI "Densley Quilt It", and yes I just made that up! IF you want your quilt to look nice without bulky seams you should SID or DQI.
While you're there put the work in and make your quilt look nice without Bulky Seams aka "BS".
This is just my opinion for custom quilts.

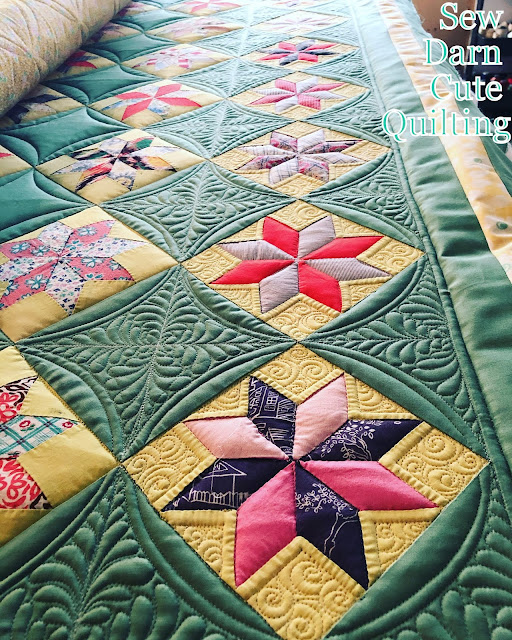
I love when the quilting comes together and makes a secondary pattern.


Backing


All Done.
Thank you, Sandy

Out my Kitchen Window

Comments
Post a Comment
I would love to hear what you think and answer any questions that you may have. If you do not have a Google account you can leave a comment as Anonymous. April