Midarm like a Pro!!!
I have a Midarm Grace Frame it is actually the Original Grace Frame, which means it needed a bit of tweaking. I found it on Craigslist for $250.00 I was able to take it home for $200.00. The frame was already together as a queen size frame, it came with King extension, engraved quilting guides, and a wooden frame for my sewing machine.
What came first the Sewing Machine or the Frame?
For me it was the Sewing Machine.
Once home my husband helped me unload the frame and it was my job to finish assembling the frame. This took hours even though most of it was already put together. Directions drive me bonkers, I'm not the kind of person that buys patterns, I would rather make them up! Oh how I long for EQ7. Once the setup was complete, it was time to figure out those rails and how to make cloth leaders???? YouTube helped, I had instructions too, but mostly Kathy Quilts showed me the way. As for the cloth leaders Grace Frame provided instructions in the directions. The amount of joy that I had was overwhelming. I HAD A QUILTING FRAME!!! and It worked Pretty Good? YEAH.......

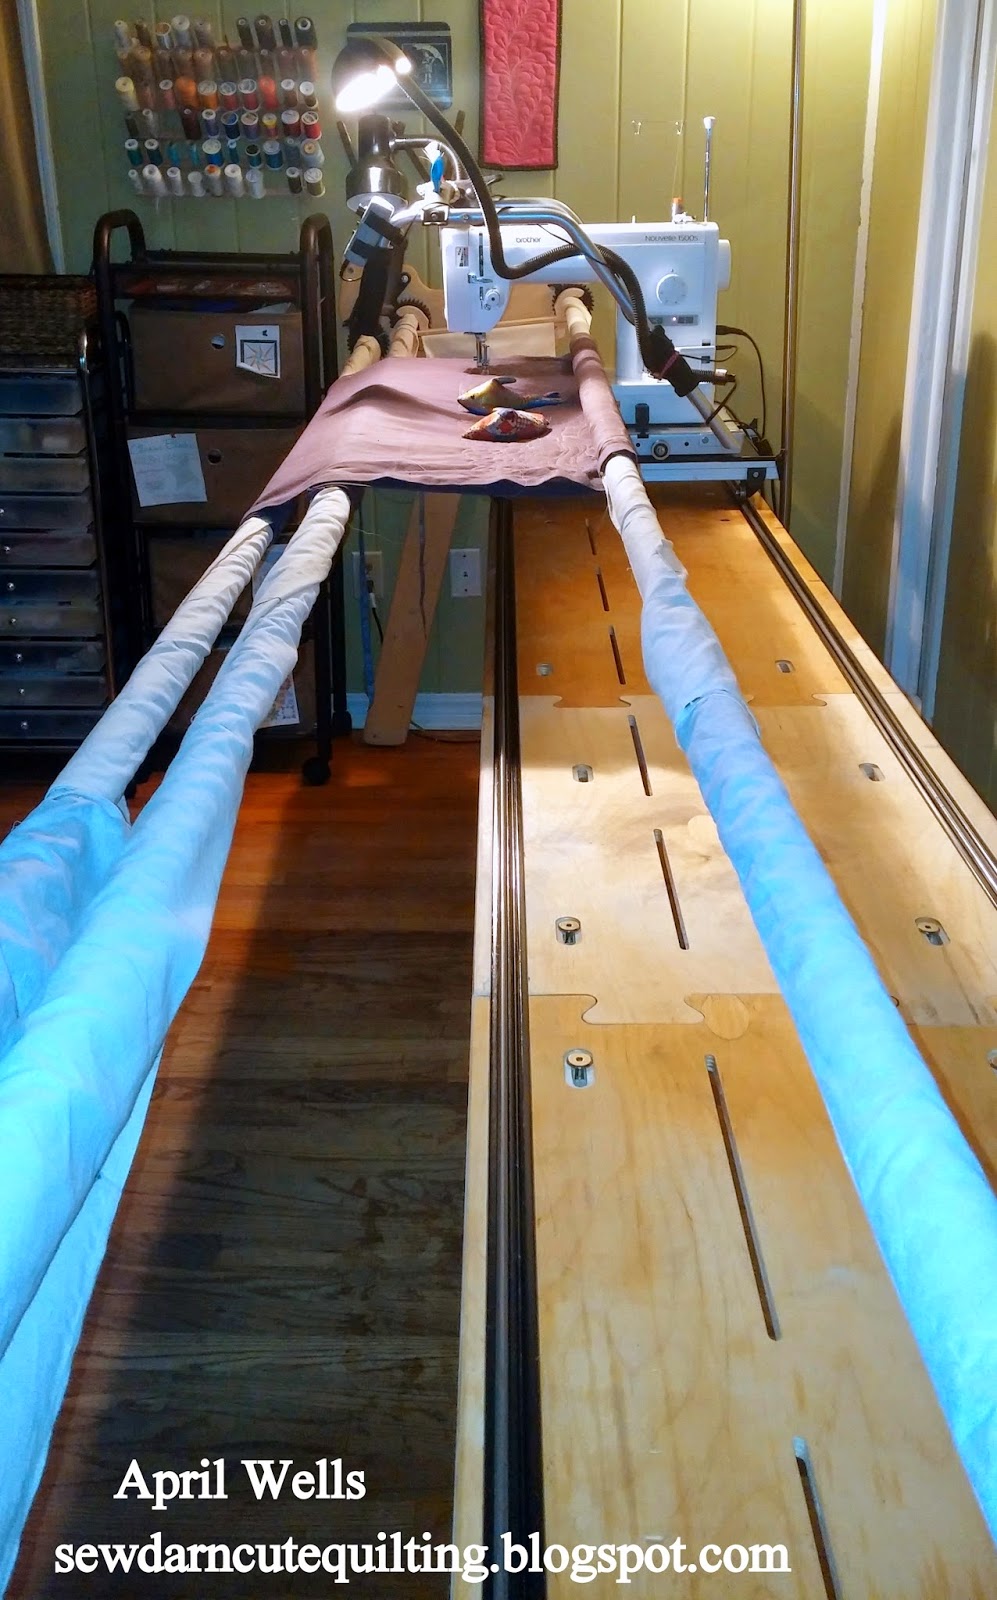
This is what it looked like on the picture above, the frame for the sewing machine is wooden.
Here is where the journey began.
How could I get my Midarm to glide like a Longarm?
Google here I come!
1) I found some accessories like a metal frame to hold my Brother 1500.

2) A Speed Control Box with a Pulse Button, On/Off Button and a Speed Dial.

3) Rails and Lithium Grease - Once I expanded my frame to a king size I went to my local metal supplier and purchased 2 twenty foot long 1/4 inch steel dows. I had them cut to 130 inches long (king size length of the frame). It is very important to have one full length so that you have a smooth stitch without skips. The plastic rails that came with the frame gave me skips and where very frustrating. As for the Lithium Grease you can get it at you local hardware store. Take some paper towels and wipe down the dows with the grease once the grease has coated the dows get a fresh towel and clean off the excess grease. A little grease is okay but not enough to see it.

I use clear tape on the back of the frame to keep the cord from catching on the grooves that hold on the wooden etched frames. Which I do not use I would rather mark my quilt to get a more accurate quilting. Do what works best for you.
4) Level - If your frame is not level you will break your thread over and over until you want to scream or cry. Check all of the rails and the frame itself. My floor is not level so I added felt on the legs of the lower side.

Once all of these Items were in place my quilting was smooth!!!!!
Here are a few smaller tools that I have added:


Always use a good thread, I prefer to use Aurifil Cotton 50/2. It very rarely breaks, has low lint and a nice sheen.


Another little tip is to always make sure that your presser foot is up when you are re threading your needle. This will place your thread in the right spot between your tension disk and reduce thread breakage. As seen below the presser foot is up.

Below to the Right is the head of a rice filled dolphin, the weight will hold your quilt from wobbling as you are quilting which results in less thread breakage. I also use rice bags.

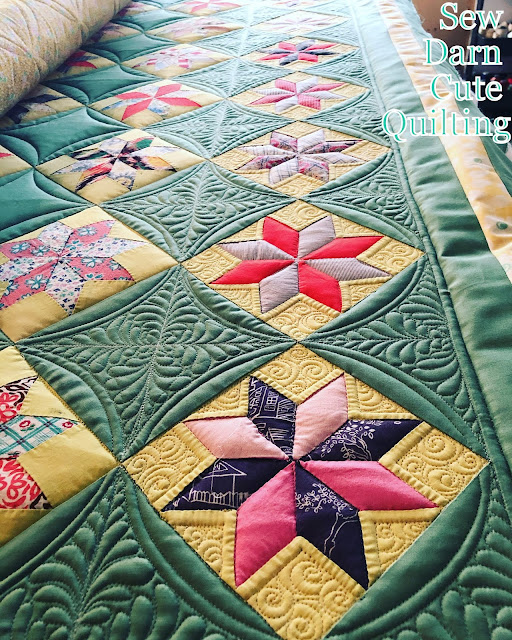
Remember the goal is to have a smooth quilting experience and to be creative. Creativity is hard to find if your thread breaks every two inches. This might seem like a lot of work at first but now it comes naturally to me.
Let's see what I have invested so far into my quilting frame.
- Brother 1500 - used - $600.00 local sewing store
- Grace Frame - used - $200.00 Craigslist
- Metal Frame - new - $120.00 Overstock/Grace
- Speed Control Box - new - $50.00 Overstock/Grace
- Rails - new - $12.00 local metal supplier
- Cloth Leaders - Muslin - $10.00 Joanns with a coupon
Total - $ 992.00 not bad :)
Some prices are a little more now, inflation. All of the other stuff like the lights and tweezers I had around my house. I am not saying that my setup is better than a Longarm because it is not. A Longarm has more quilting space and stitch regulators are nice. My Grace Frame is to hold me over until I want to invest more money and time into my quilting. Also there is a Stitch Regulator for the Grace Frame it is about $400.00 and I have not heard a good review yet. If you have a Grace Frame Stitch Regulator please leave a comment on how you feel about it. Can it be tweaked too? I would love to hear from you.
This is one of my first videos let me know what you think. Thanks and Quilt as you Desire.

Great job April...... Just goes to show, where there's a will there's a way ;-)
ReplyDeleteYes, very much so.
ReplyDeleteGreat job April, and you make it easy to understand ... Fantastic.
ReplyDeleteThank you
ReplyDeleteThank you, thank you, thank you!!!! I love all the information in this post!
ReplyDeleteI am so glad, I love my setup but it took some tweaking before I got there. I am so happy to be able to help others get there too.
ReplyDeleteTHANK YOU SO MUCH FOR SHARING! Sorry, I holler when I'm excited! I recently picked up a frame, and looking to modify it to fit my needs! HUGE help! Much appreciated!
ReplyDeleteI am so glad that it my post was helpful to you. I wish many days of quilting.
ReplyDeleteI bought a little Gracie (preloved) and I have a singer 201.
ReplyDeleteI haven't try it yet. My studio should be almost finish and ready to be use in one week.
Anyone else with the same setting? I heard so many good thing about the singer 201.
I also owed a 15-90 and few other vintage sewing machine .
I checked out the Singer 201 and the throat space looks like you should have enough wiggle room. I think you are good to go. If you have any questions while setting up your frame and machine you can ask and I will try to help. Good luck with your new sewing studio and midarm setup. Practice is the most important when first getting started. I probably went through at least 50 practice pieces. Even to this day in between difficult quilts I will through on a practice piece just to go wild and crazy on it. :)
DeleteI'm confused as to what the steel dowel is for. Is it A rail for the carriage to slide on? Why a dowel instead of ankle iron. I'm making my own frame.
ReplyDeleteYes, the dowel is for the carriage to slide on. On this particular frame there were plastic rails that linked together and at each link my machine would jerk. If you look at the picture with the dowel you can see the plastic rails, they were grooved and the dowel fit perfectly in between the grooves. I think this is a case by case solution depending on the type of track system that you have. This is what worked for me for the best glide. I did not try an ankle iron so I could not give advice on it. Before I purchased the whole piece from the metal yard, I did go to Lowes and bought 2 short dowels to see if it would work before I made the investment. You can return them back to Lowes I was not sure about the metal yard. So try both and let me know how it goes. I would love to know what you find out.
ReplyDeleteAre you still quilting with this setup? I have an original Grace frame but have not found a machine I like using with it. I like that you switched out the frame that the machine fits into to make it glide easier while sewing. I'm not sure whether I should keep looking for an affordable sewing machine or just scrap the whole thing and sell my frame.
ReplyDeleteI now have a Gammill Vison 22 and I love it. I sold my Grace frame but kept my sewing machine, it's my baby.
DeleteI purchases a used Original Grace frame since I'm new to quilting. I've been trying to find videos/instructions on how to use the pantographs with no luck. Do you have any suggestions? I have an OLD trusty White sewing machine that I'm not going to part with. There isn't a spot on the bottom to attach it to the quilting base so I'm hoping this will all work.
ReplyDeleteI sent you an email though my email address so you can send some photos of your setup. I look forward to seeing your setup.
Delete