Feathered Vintage Green Quilt
My first custom of the year!!!
Quilting Breakdown:
Thread - So fine 401 and Bottomline White
Batting - One layer of Quilters Dream Wool
Marking Tools - Purple Marker and Chalk Pencil
Rulers - Curved and Straight Edge

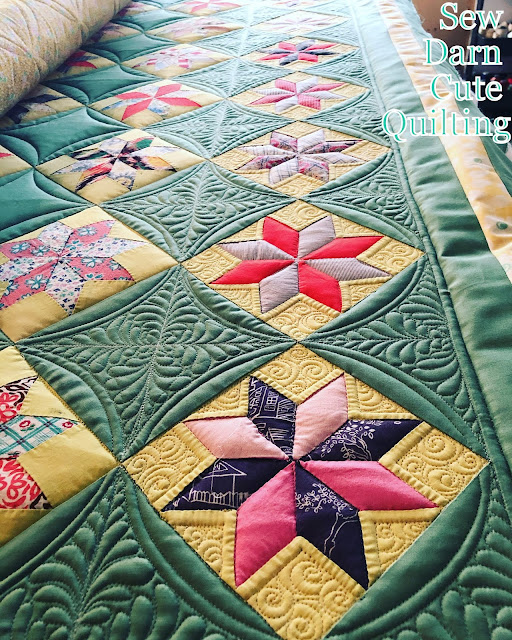
Above is a pre-quilted photo.
Behind the Quilt Top... The owner (Carla Gay) purchased it from a flea market in Fayetteville, AR for $20. At first, the quilt background color was orange and in need of a change. She had several dear friends help her unstitch all of the orange blocks from the yellow star blocks. There were 90 of the yellow star blocks on the original top, so this was no small job. In the final quilt, only 72 blocks were able to be used. Then Carla perfectly pieced the yellow blocks to the green fabric and the borders.
I think that this is an amazing labor of love to keep this quilt alive for many many years to come.
I think that this is an amazing labor of love to keep this quilt alive for many many years to come.
This is where I get to poof it up.
At first, these were the thread options that I sent to Carla, all-around about a 50# on all the threads.

We decided on SoFine 401 which is number 1 because of the matte finish, which gives the quilt a vintage look. I began stitching in the ditch and quilting the curves inside of the green squares. Once the quilting began on the little swirls in the yellow fabric I found that the 50# was too heavy and built up too much. We decided to switch to Bottom Line which is a 60# (thinner thread).
It was perfect!
Below are a few ideas that I was thinking about. We decided that a secondary design would be wonderful within the green blocks. This began to happen with the curved quilting. Now to figure out what quilting design was going to be in the middle of the green blocks.

feathers coming in

straight lines


Oh La La

Finally, we decided on feathers going out.


I just fell in love with this feather quilting design. Also while searching Pinterest for this curved open space. I found a ton of Double Wedding Ring Quilt ideas and found that I love them.

As you can see the curve pattern is also emerging.

This is my little corner of the world and I love it!

I'm a SID (Stitch in the Ditch) kinda gal but, recently I have seen SID not quilted but highlighted.
Like the picture below.
It conflicts with my SID theories but it looks awesome. Maybe for a more modern quilt? Of course I SID but I had to take a photograph and keep it in the front of my mind to try this out on one of my quilts.
Like the picture below.
It conflicts with my SID theories but it looks awesome. Maybe for a more modern quilt? Of course I SID but I had to take a photograph and keep it in the front of my mind to try this out on one of my quilts.
Tell me what do you think?
SID or (Stitch Around The Ditch) which comes up to SAD. I think we need a different acronym???

Here it is the border!!!

I was a bit nervous but I kept telling myself every feather just needs a stem or a home base.
Yep, I still get nervous. Those quilts are the ones that come out the best.
Yep, I still get nervous. Those quilts are the ones that come out the best.

The border corners are my absolute favorite. Looking at the pictures now makes me just want to feel those feathers. 👐

All done!


This quilt took around 2 months to finish but only 20 hours. During this time Christmas came and went, I had Strep and the Flu. No matter how hard I pushed I just kept getting pushed back down. By the time I got hit with the Flu I just gave in and laid down. Sometimes we push ourselves too hard and don't take the time to rest and that is when our bodies make us rest. My youngest son (Wyatt) and I both had the flu at the same time, we binge-watched tv and slept. Something I will never forget, fighting the flu together. :)

These outside pictures are my favorite.

Take Care of Yourself and
Keep On Quilting!
Lots of Love, April

Absolutely beautiful! Donna Thomas
ReplyDeleteThank you, Donna. I really appreciate your comment. :)
DeleteI love how you did the feathers. I have a lot of trouble with feathers. I hope I can master them someday.
ReplyDeleteIt takes a ton of practice. My favorite class for feathers was by Cindy Needham - Design it Quilt it on Bluprint. She says that your feathers need to swoop. Really it's the best class i have ever taken. She is a wonderful teacher.
ReplyDeleteBeautiful quilt...but totally gorgeous quilting.
ReplyDeleteThank you Sew Much!
DeleteStunning work! It’s amazing how just the right custom quilting can make even the simplest of patterns evolve into an heirloom quilt!
ReplyDeleteBeautiful story, gorgeous quilting. No need to be nervous.
ReplyDeleteThank you, Debra! I think one day the nervousness may fade but I'm okay with it. All the ones that make me nervous turn out to be amazing.
DeleteSo incredibly beautiful! I see you do not seem to do "bump back" feathers? I like that there is no thread buildup on the outside curve of the feather tips. Looks so lovely and clean!
ReplyDeleteThank you so much! I do enjoy quilting feathers this way. It seems to flow very easily.
DeleteI love this quilt and your quilting. The way you posted pictures and your thoughts through the whole process is really helpful for us newer quilters. Thank you for sharing. I found you through your work posted on Pinterest.
ReplyDeleteIt makes me so happy to hear that you found my blog post helpful. Thank you 😊
DeleteI was searching pinterest for large border ideas for the most important border on a custom quilt I'm doing and am loving your feathers. Right now it's my top pick for this quilt. You did a beautiful job!
ReplyDelete😊 Thank you
Deletewonderful!!
ReplyDeleteUseful insights for embroidery lovers.
ReplyDelete