Colorway Quilt
Pieced by - Elizabeth Ray
Pattern - Colorway
Fabric - Bonnie & Camille
Thread - Cream 50wt
Batting - Quilter's Wool
Longarm Quilted - Free Hand, Full Custom
Some pictures are a bit off on the color.
You can see the real color of the quilt by the pictures that where taken outside.

Here it is, fresh and ready to be quilted, but how?

A friend of mine pieced this quilt together. She is entering it into the local quilt show, Heirlooms XVI QUILT Show along with many of her other beauties. When she got in touch with me to see if I could quilt it, I jumped on it. First of all I have always wanted to quilt quilts that are exhibited in quilt shows. Second it has been at least 6 months since I have quilted anything other than play around quilt sandwiches, due to all of our renovating. There was a catch, I had 11 days to complete it. Also I wanted it to be AMAZING. She said quilt it how ever you want and I thought YES!!!
 Ready.. Set.. Go...
So now we are back to the How question. My thoughts went straight to the border but wait the top and bottom are different from the sides. In size and design. So??????
Let's start in the middle.

My tools are:
2 blue water soluble markers or 10,
a drafting ruler,
curved blue template and
a 4x6 quilting template,
mine was from Handi Quilter but they no longer carry it. :|
First I need to do the stabilizing stitches. Its like SID with a twist.
I consider this to be the large part of the circles like the Cream and Green area Below

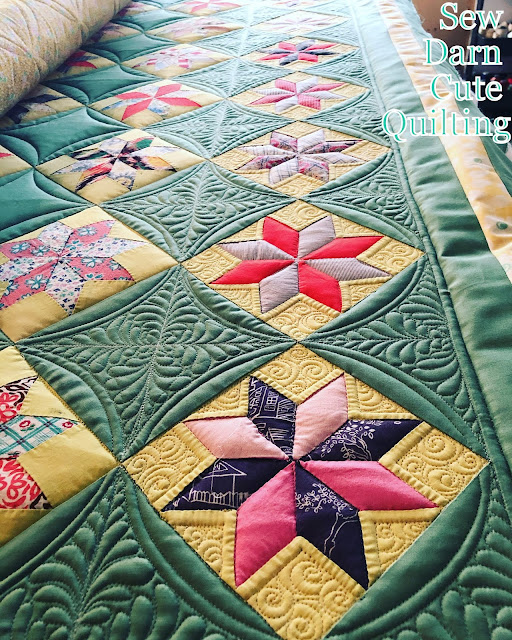
On to the outer circles, this one is 'CREAM AND GREEN'. First mark the center of each cream rectangle on the short sides, top and bottom. This was definitely a dot to dot quilting experience. First a V in one direction all the way around from the inner points to the outer middle point then reverse it. This is where you will stitch the straight lines along the sides of the cream rectangles. This will help you to get to the other side. Once done with the rectangles be sure to go around the outer part of the blue octagon, SID. You can make this design all in one start and moving from block to block throughout the quilt. This will also Stitch in all of you Ditches so no need to SID in advance.

I love how this design comes together.

And the fun begins,
the quilting for the center is a mixture of swirls and pebbles.
Hold up, we have to do the straight echo lines first.

In the middle of each circle there is a octagon. I decided to echo 1/2 on the inside. This became tricky trying to figure out at what point to stop and change direction. If it would have been a 1/4 of an inch I could have followed the edge of the fabric with the edge of the hopping foot. I needed to make my own Stop point, by drawing a line 1/4 of an inch inside of the octagon from the edge of the fabric. (See Above)

At this point I am able to use a straight edge quilting template. The one that I am using is a 4x6 and yes that is a suction cup. It works as a handle. I can grab it with my hand laying flat and bring 2 fingers together over the top part and pull it up.

Now it is clear where to stop and turn my ruler, following the blue line all the way around.

Here we go Swirls and Pebbles galore.
Stitch in the Ditch Yes or No?
I stitch in all ditches that at not being heavily quilted in.
Example:
There is not any SID on the inside of the Blue Octagons or Blue Squares, they are heavily quilted.

What is this I see?
I love to make my quilts just a bit different. This effect will make them stand out. This quilt has 2 blocks with these straight lines. 1 over from the top left and 1 over from the bottom right.

This is the design for the Squares in between the blocks. Each center point is 1/2 inch down then straight line all through the middle. I used my 4x6 straight edge ruler.
Using my drafting ruler to mark my points.

Border Time

I have spent all this time in the middle to help me decide on the quilting designs that will show off this border. I wanted to somehow blend these squares in with the borders.
.
.
For the Squares at the top and bottom border.
First SID around the outside and inside of the red squares, while your on the inside quilt some swirls in the middle. From the center swirl area use the piecing to help move straight across from the side of each square. This method will help you to work your way over to the next square without a stop and start. Isn't that what we all want, less Starts and Stops.
First SID around the outside and inside of the red squares, while your on the inside quilt some swirls in the middle. From the center swirl area use the piecing to help move straight across from the side of each square. This method will help you to work your way over to the next square without a stop and start. Isn't that what we all want, less Starts and Stops.

On the Outer side of the squares I echoed 1inch around the squares all the way across the top and bottom. Just like a zig zag line.
When quilting the zig zag I also found that I needed a stopping point. So I drew a straight line directly from the center point of the square
See Below

Once the zig zag work was done.
It was time to start really working on the border.

The line of pieced squares at the bottom and top of the quilt were used in the quilting to help pull the quilting in with the piecing. Squares where quilted into the borders.
Check it out Below:
Here is that square gradually getting smaller. This is the corner motif for all four corners.
Check it out Below:
Here is that square gradually getting smaller. This is the corner motif for all four corners.

Below:
In the middle of the borders 2 feathers come out of this square to meet up with the feathers coming from the corner squares motifs. This motif was repeated 4 times.

Another little trick when working with all different angles is to add an in-between.
My in-between is a cluster of swirls which you can see in the picture Above, at the top of the square. This will keep you from running into an angle issue. If my cross hatching was to keep going it would not have been the same angle as the square. So a bit of filler always helps.

Corner and center squares went on first to be followed by the feathers.
A total of 16 feathers 4 on each side.
A total of 16 feathers 4 on each side.
Above: I used the curved blue template for the spine of the feathers.

Then I randomly placed swirls around the zig and zag and tucked in around the feathers. Inside of the feather curl is crosshatching. I used the swirls help to fade from cross hatching to straight lines.
See Above and Video Below
Once the Feathers and Swirls are on the cross hatching and the 1/4 lines can begin.
Make sure yours swirls are down first.


Don't forget to check your quilt for threads and markings.
Check it twice and make sure all of your quilting lines are quilted
.
Here is a video on how I clean up.
ALL DONE and 1 day early.


Elizabeth sent me this picture after she put on the binding, so we could all se the finished quilt. She used a Flange binding.
I love it.
Thank you Elizabeth, I can't wait to see it hanging at the Quilt Show.


What a beautiful quilt! Your quilting brings it to life. I like how you finished the top and bottom squares on point by ghosting them. I would have liked to have seen more of the side borders and how you quilted them even though they were different.
ReplyDeleteHi Joy I hope todays post is better. So sorry the save button is next to the publish button and I pushed the wrong one.
DeleteIt's a great post with a great tip about taking the eye way from cross hatching that doesn't quite line up.
DeleteApril I love it so much!! It turned out so great. I liked reading about the process and seeing all the pictures. I miss this quilt since it got turned into the show. It will be great to see our work hanging up and displayed soon. Thank you again for taking on this challenge!
ReplyDeleteElizabeth, I am so happy that you love. I am so Thankful to have you as a friend. :)
DeleteThank you so much for posting the how you quilted this quilt. It is just beautiful,the quilting and all your wonderful ideas. More please.
ReplyDeleteI got to see this in the show yesterday and wrote down your name in hopes of finding a blog (which I obviously did, yay!!) I told my friend it looked like something Judi would have quilted, so when I saw her blog on your sidebar, I was like Yes! I was right about the influence :-)
ReplyDeleteYou did a beautiful job on this quilt and totally brought it to life! I loved how you added the squares in the corners to carry on the piecing in the borders. Very clever to add the swirls to break up crosshatching and corners. We (the friend I went to the show with and I) noticed the 2 matchsticked centers right off - loved that touch. I think this is quilted just the perfect amount - not too much, not too little. Outstanding job!
Happy quilting ~ Tracy
Tracy, Thank you so much. I had so much fun quilting this quilt. We had been renovating for about 5 months (no quilting included) and I think all of that time without quilting made me just burst with quilting madness. Judi is one of my absolute favorite quilters. I have not yet met her but I have taken her classes on Iquilt. Hopefully one day I can take a class from her in person.
DeleteI'm not sure you really need that class....
DeleteYou are so kind. :)
DeleteThis quilt is stunning!! The piecing is beautiful - she did a great job - but the QUILTING!! So amazing!! I love the way you combined the feathers and the swirls, along with the straighter, more angular elements. It's the perfect combo. Beautiful, inspiring work!
ReplyDelete